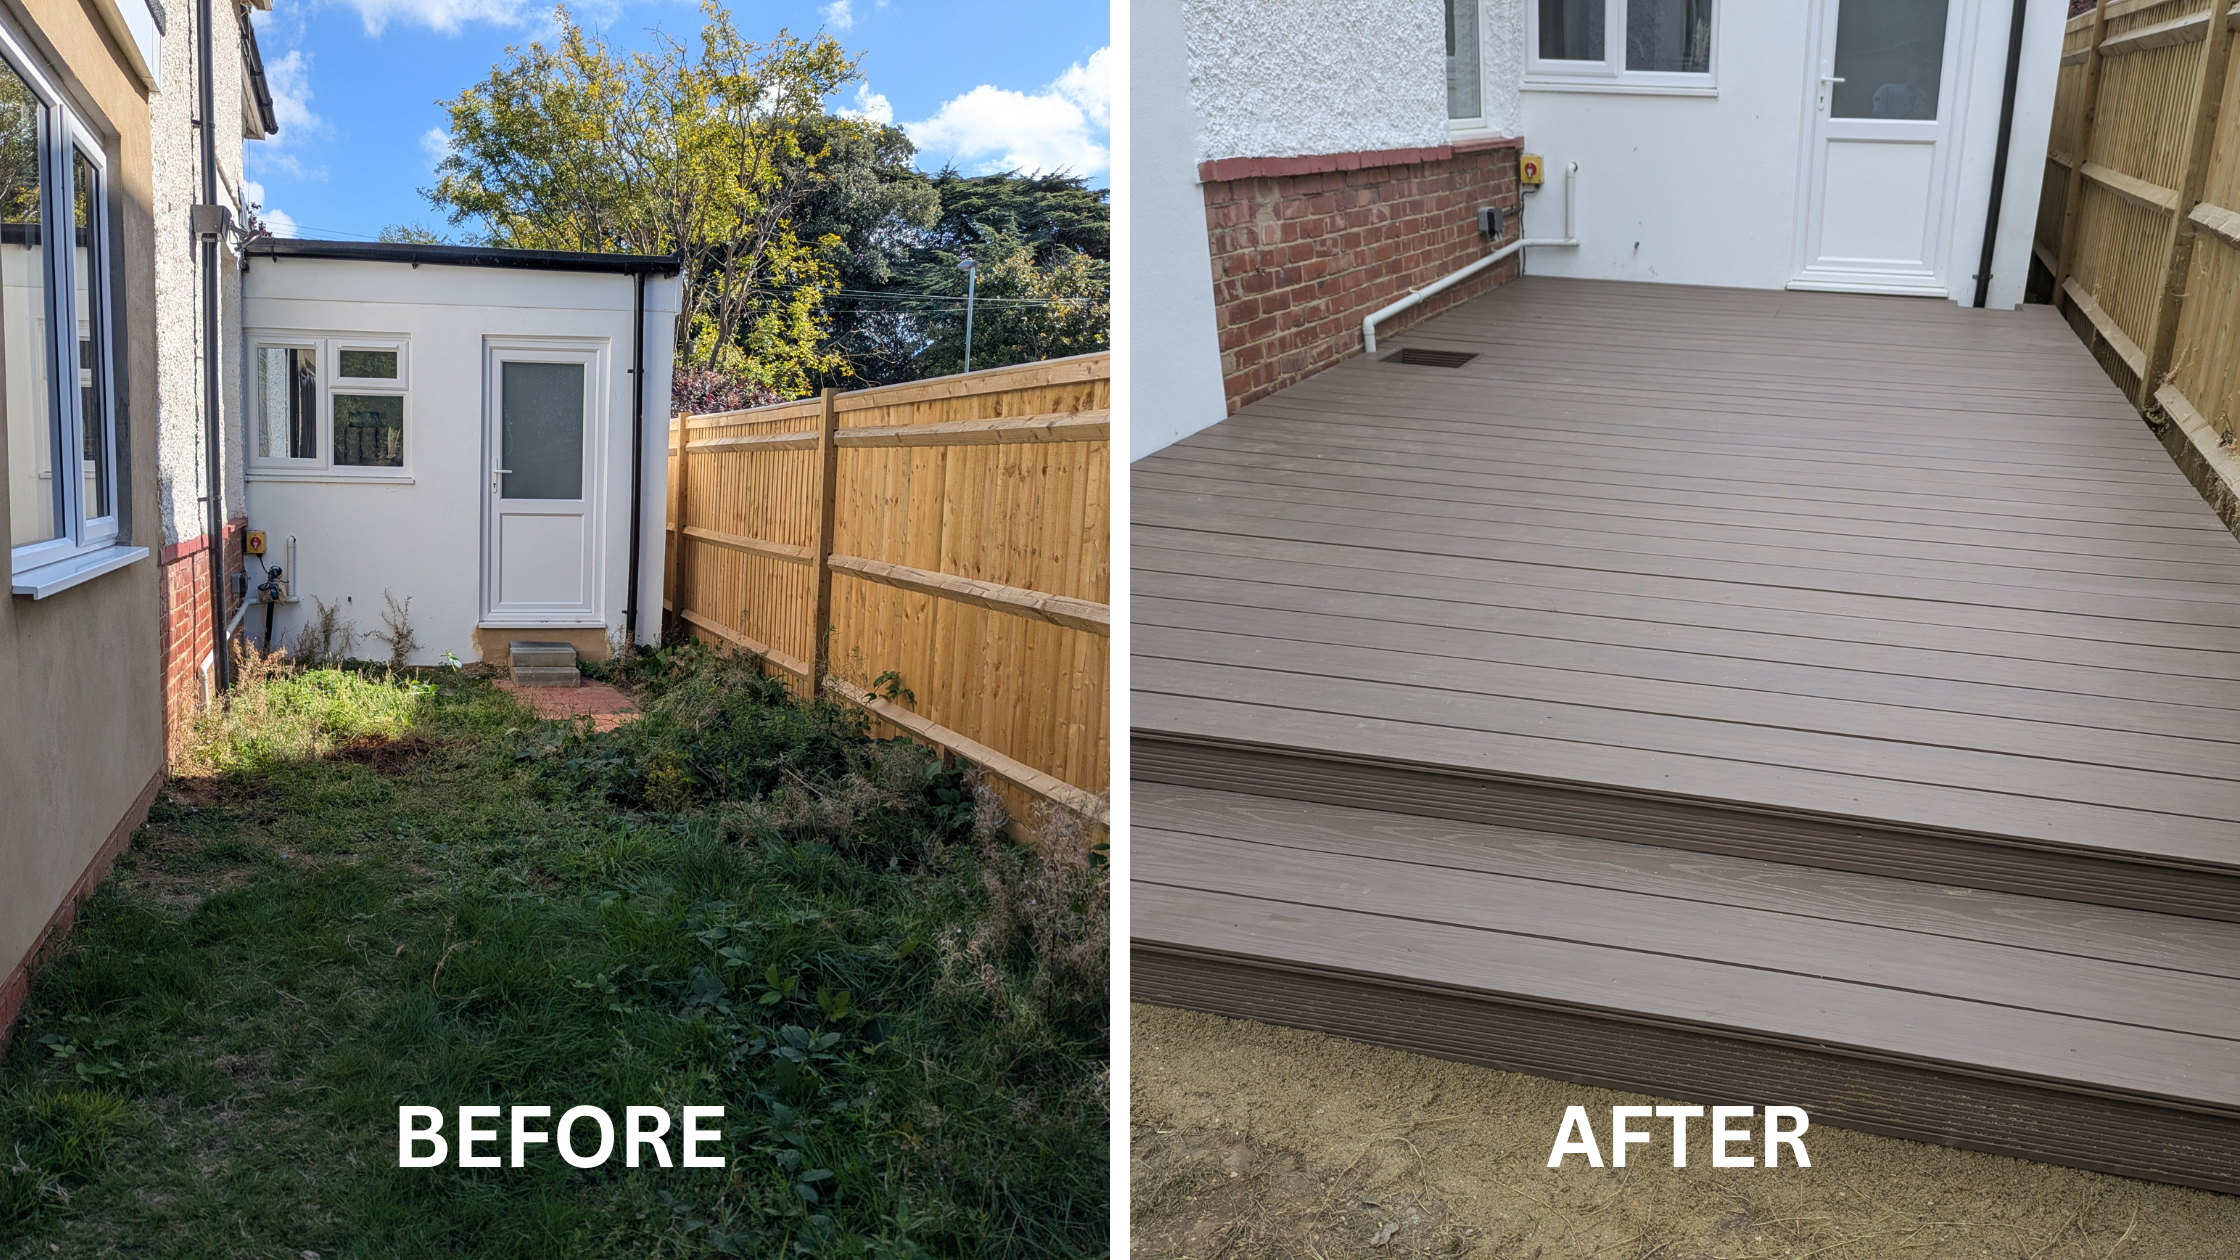
Decking & Composite Decking Installers Near Me In Sussex
Looking for decking fitters near me for a decking build? We offer composite and wooden decking builds based in Worthing, West Sussex. We offer a free consultation to ensure you choose the right deck for your budget.
Our decking and composite decking services are a great way to unlock a stunning outdoor living room, perfect for summer evenings, family BBQs, and memorable moments under the stars. Decking is a great alternative to a traditional patio, a decking installation carries the transition from indoor flooring to outdoors better than a patio, making the space in your house truly flow out into the garden expanding the room. Decking is also great for awkward shaped spaces, uneven ground and particularly good when the height of the patio or doors is higher than a steps height from the garden.
So long as your decking installation is 300mm/30cm or less from the ground then your decking installation won’t require planning permission.
Why choose a decking installation for your garden?
- Low maintenance
- Decking is much lower maintenance than patios and gardens. Patios require weeding and regular pointing repair which a decking installation doe not.
- Composite decking requires less maintenance than wooden decking. Algae and grime is less likely to grow on composite versus wood, wood decking installation stays damp for longer.
- Expands your house for a lot less than an extension would cost
- A decking installation is a great way to expand your house. Decking flows from the house in a way that a patio or garden does not. Decking can be installed at the fraction of the cost of an extension of the same m2.
- A decking installation looks good
- Decking is a quick way to complete transform your garden. Want to host a BBQ and impress your friends? Decking is a great way to do this.
- Decking builds are super flexible
- Decking can be shaped around the contours of your property and space, inclines, declines, corners are no problem for a composite or wood decking installation.
- Long lasting
- If the decking installation is built correctly, the sub-frame and decking build will last for decades.
- Reparability
- Decking builds are easy to modify and repair, especially wooden decking. Wooden decking boards are readily available and don’t change in design. Try repairing an old patio, good luck finding those same slabs!!
- Eco-friendly
- Wooden decking installation is eco-friendly, all made from natural materials that will break down given time. The same cannot be said for resin patios.
What’s the process for decking installers near me?
We’ll perform a consultation which requires us to take a look at the space and discuss shape, size and material for the decking installation.
As part of this process, following the consultation, if we feel we are a good fit for your project, we will provide drawings to help visualise the decking build and refine specifics early on.

2. Installation. The process of installing decking includes a number of milestones from clearing the area of debris and foliage to digging post holes, building the sub-frame and then installing of your chosen top deck.
We offer options for treatment of all cut-ends of the subframe and waterproofing over the joists with decking tape.
3. Quality Checks. The sub-frame must be level to ensure a clean installation of the top boards but with a slight decline to one side away from the house to ensure water runs off the deck.
Build diary for decking build near me?
Let’s take you through one of our recent deck build projects in worthing, so that you get a feel for your upcoming project.
Step 0: Decking build design
Take the time to design your decking from measurements taken on site and calculate the required materials for the decking installation.

For ordering materials, we’ve found that eDecks are pretty good.
Step 1: Clear and prep the decking build area
Clearing the area so that you have good access and a foliage free area to work in is important. For this decking build we had to remove the roots of a shrub and clear out years of weeds.

Don’t underestimate the effort required to remove tree roots and other debris, this ‘little’ shrub root took a couple of hours to remove.
You could potentially leave this in place but as I could see growth on the root I didn’t want to take the risk of future growth.
A completely dead stump could potentially be left under the deck.

Before you dive into the work, ensure that your work space is prepped with all the materials to hand. With timbers, try to stand them on blocks to keep them dry and lay them on their side to prevent warping

Step 2: Measure out decking build
Once the area for the decking installation is cleared, it’s time to start measuring out the area and marking any expected ground works.
At this stage we start marking areas for posts. We won’t commit to the post position until later in the build, you could just spray the ground with a chalk spray instead of digging small start holes.

Step 3: Dig decking build post holes
This stage is intertwined with the framing stage. There are various timings that decking companies will use to dig holes.
- Dig the decking post holes and even set them at the time of measuring the area before any framing happens
- Dig the holes early but don’t set the posts to enable adjustment when the decking frame is assembled
- Assemble the decking frame perimeter and stand on temporary legs to get the position and levels correct. Once the decking frame is temporarily in place, you then mark the post holes.
We prefer to assemble the decking sub-frame perimeter and secure on temporary legs in the correct position, mark the post holes and dog them out.
Once the holes are dug, we place wood preservative and a damp proof layer on the base of the post. We use use concrete blocks in the base to help preserve the wood. The block also helps with stability.
We’ve found that attaching the sub-frame perimeter to the property (if not free-standing) with a couple of bolts (so it can be adjusted if necessary). This is followed by securing temporary legs, checking levels before setting posts is the most efficient way to do this.
Once the frame is in place, we set the posts, using the frame to ensure the post is in the correct position. If you find the frame timber isn’t straight then we use packers between the post and the frame. Once the decking post is set, we remove the packers and secure the frame to the post pulling in the timber to remove the warping.

Step 4: Build decking sub-frame outline
Composite decking and wooden decking boards are not placed directly on the ground, instead we lay them over a frame similar to the floors in your hours.
We prefer to use 6″x2″ pressure treated joists. Some decking fitters will use 4″x2″ which is generally fine but can require more posts. Depending on the layout as longer lengths won’t be as stable as longer lengths or the larger timbers.
It’s important to use pressure treated timber for the decking build. Untreated softwoods used for internal drywalls (e.g. the classic 4″x2″ will rot quickly) .
We also recommend treating every cut end with a preservative. The pressure treatment only protects the outside layer of the wood which is com[promised when cut.
It’s important to ensure that the deck has a slight decline away from the property. Although water won’t build up a lot as there will be gaps between the boards, you want to avoid as much standing water as possible. A spirit level is an important decking specialists tool.

Step : Secure decking frame to house (if not free standing)
Once the sub-frame is held in place temporarily, if the decking adjoints a property or wall, now is the time to secure the frame to the masonry.
To do this, we need a powerful SDS drill and a set of masonry anchor bolts which are heavy duty 12-16mm diameter threaded bolts with strong plugs. In this case we use metal anchor plugs which will prevent movement.
It’s not uncommon to just use self tapping concrete bolts (you can see one with a hex head in the first image. These are super fast to install as they don’t require a plug or any resin.
So long as they are in the center of a brick, they should hold well.
I have seen them to come loose over time. As such when building decking we use the self tapping bolts as a way of tacking the decking frame to the house. This we then reinforce with heavy duty anchor bolts to ensure there’s no movement in your decking build.


Step 5: Set decking posts
At this stage of the decking construction we set the remainder of the posts with postcrete which is a fast setting concrete pre-mix. Depending on the ground, you may want to use 1-3 bags per post.
How much postcrete to use? If the ground is on a slant and the decking is raised, perhaps totally free standing and in soft clay you would lean towards 3 bags per post. In hard chalky soil with a run of decking sub-frame anchored to the property you might go for 1-2 bags per post. It also depends how far spaced your posts are. If you using 4″x”2″ with 1m spacing you might get away with a bag per post.
If in doubt add more concrete 🙂

How to ensure the decking posts last as long as possible?
We treat the post with end grain sealer. We then place a layer of damp proof between the end of the post and ground, followed by setting the post on a concrete block.
In addition we slope the postcrete away from the post. This ensures water does not pool around the base of the post. I really enjoy this bit 🙂

Step 6: Lay anti-weed membrane under your deck
To prevent grass and weeds growing up through gaps in the deck, we lay down a layer of anti-weed membrane.
This membrane prevents light passing through which retards plant growth. The beauty of this stuff is that it let’s through moisture to prevent any water build up under the decking build.
This phase is a bit fiddly as you need cut round each of the decking posts but it’s worth the time to do it properly.

Step 7: Hang joists and noggins to support decking
When hanging joists the material that you select for the top of your decking installation will determine the joist ‘centers’ e.g. the spacing between each joist.
Composite decking typically requires a tight 300mm center s. Wooden decking can be spaced with 400mm centers as it’s stiffer than composite decking boards.
Long joists, although very strong when hung on their side to prevent movement up and down are not so strong with side-to-side pressure.
If you walk on an unsupported joist it will wobble left and right.
We cut small lengths of timber to be placed between the joists to prevent any movement. This approach also pulls the wood back together to ensure decking fittings can be spaced correctly. Most joists will have slight warping. These small reinforcements are known as ‘noggins’ locally.
We off-set these along a string line to enable easy installation through the side of the joists.
It’s important to measure noggins from the start of the joist run e.g. where the joist is attached to the frame. This will enable you to get the correct measurement and accounts for any warping. The nogging can then be secured. If the joist is warped you may need to wrestle the noggin into place or use clamps to pull joists together.
REMEMBER to seal every end grain for each noggin.

At this stage of the decking construction we tend to add additional bolts between the frame and the posts. As you can see in the image above there is a large stainless coach bolt paired with 2 hex head 8mm timber bolts. This ensures a strong hold.
The coach bolt goes all the ay through the decking sub-frame and decking post and comes out the other side, being tightened with a spanner.
We use 10-12mm coach bolts generally.
You’ll need a very long augur bit for installing these.
If you’re passing it through a 2″ or 47mm timber along with a post which is likely to be 100mm, you may even be sandwiching two joists adding another 47mm.
I use 450mm long augur drill bits for this.
Step 8: Ensure decking frame is level
This step is super important. Triple check that the frame is both level and as seen in the blow picture runs away from the property.
I find that ensuring your spirit level bubble is touching the line on one side ensures enough of a decline.
For a 3m wide frame, the bubble touching one end of the level will provide a 6-8mm decline in the decking across the full length.
We use a laser level throughout the build as well but you can’t be a traditional spirt level for decking construction.

Step : Cut off decking posts
Post’s need to be cut down. This image isn’t actually the right one to use, this was taken from earlier in the decking build.
At this stage the posts are in the ground, so you want to use a reciprocating saw to cut the posts off in situ.
It’s also much easier to cut the posts off before you install all of the joists to ensure you have room to work.

Step: Build decking stairs (and consider railings)
Adding stairs to your decking will improve the look and functionality but can be confusing to build if you’re not done them before.
With stairs we don’t want a drop that’s too high (over 300mm) to ensure it’s easy to get up and down but also not too low (under 100-150mm) to prevent tripping.
You also want to honor the slant away from the house. If possible decline the steps down slightly to make it easier to walk up and down but not so much that one slips.
At this sage you’ll want to measure and mark where any railing will go.

Step 9 (Optional): Waterproof sub-frame of your decking
Waterproofing the subframe by laying a damp proof between the joists and the decking boards is not required but will increase the lifespan of the frame. Water can sit on top of the timbers below the decking boards.
There are various ways to do this, the best method is to use decking tape which can be stuck down to each joist.
This stuff is great but costs quite a lot, £100-150 for a small deck.

Step 10: Install decking boards
When installing the decking boards, spacing is critical.
Not only will the decking planks expand and contract but gaps are required to ensure water ingress and aesthetics.
To ensure perfect spacing we use decking spacers which ensure a consistent gap all the way along.
This stage does differ slightly between composite and wooden decking boards.
Composite decking tends to expand and contract more than wood, so a 10-15mm gap along the property is important.
The temperature on the day of install can also affect the boards so be aware of the temperate and ensure the boards are laid out ‘dry’ before fixing and allowed to adjust.
If the weather is super hot when you install the decking, go for tighter gaps as the boards will contract. Similarly on a cold day go for larger gaps to account for expanding of the composite decking boards.
To fasten the decking boards there are three common options;
- Screw through the top of the boards
- This is the quickest method but least aesthetically pleasing. Premium hardwood decking often comes with plugs that can be tapped into the screw holes to hide the screws but this takes extra time)
- Screw at a diagonal through the bottom corner of the boards
- Using a jig, you can angle the screws through the button edge of each decking piece. This hides the screws but is a nightmare to make adjustments.
- Use hidden decking fasteners (this is the option we go with for composite decking installation as seen in the image below)
- These fasteners ensure consistent spacing and don’t leave screw holes in the top of the decking


We always start laying decking boards from the outside in, ending the run against the property. This ensures the edges of the deck are neat with full width boards and the cut boards will be against the property which somewhat hides them.
You may also need to frame or box out drains. On this project there were two sets of drains to frame. This takes time but is well worth the effort as the results look great and ensure ongoing access to the drains.
Step: Check levels of your decking build
We’re almost there, as we lay each board we want to check the levels. This is the last chance you have to plane down any uneven decking joists to ensure a level surface.
Hidden decking clips also pull the boards down at the edges, so ensuring that you are applying the same pressure to each decking screw is important, you can adjust the tightness at this stage to prevent and unevenness.
Step: Treating decking timbers with end grain sealer
As we discussed earlier, treating any cuts to timbers from joists to posts is important.
End grain sealant is a applied with a pain brush and seeps into the wood offering a chemical protection for years to come.

Decking installation complete

Garden Decking FAQs
- Does decking need cleaning?
- Decking will need cleaning each year.
- How to clean my deck?
- For composite decking you can wash it with a pressure washer on a gentle setting and then you’re done. It’s optional to treat it with a product that prevent algae and slime build up.
- Wooden decking is a little more involved.
- You’ll want to wash it with a gentle setting in a pressure washer or traditional stiff broom and soapy water.
- Once dry, treat with a preservative stain.
- Add an anti-uv coating to protect the stain
- What are the benefits of garden decking versus a patio?
- Decking is a great way to extend the living area of your home. It’s clean, neat and a great place for hanging out or entertaining.
- What is the best material for a low maintenance deck?
- Composite decking is the lowest maintenance decking board.
- How many years will i get out of my wooden decking?
- A wooden decking, if maintained and built with treated, sealed timbers will last 20+ years
- How many years will i get out of my composite decking?
- The composite boards will last indefinitely. If the sub-frame is timber and installed correctly this can last 30+ years.
- Is composite decking worth the cost?
- Composite decking is more expensive but not that much more expensive. The boards themselves will cost perhaps 2x wooden decking boards (although I’ve purchased clearance composite decking at the same cost as wooden decking). The frame will cost a little more due to tighter spacing but generally the frame, posts, weed membrane and fixings won’t cost that much more than a wooden decking installation.
- Can I put a decking over my old patio or concrete pathways?
- Yes. So long as the patio or concrete is stable, this means that post holes won’t need to be dug which speeds up the build and lowers the cost.
- How long does it take to install a decking?
- Depends on the size. A small decking over a patio can be done in a couple of days whereas a larger decking 20m2 or above, raised, over slanted ground requiring lot’s of posts will take longer. The 20m2 project above took the best past of a week for 2 people.
- How do I prevent my deck from becoming slippery?
- Ensure you clean the deck regularly especially after winter. You can also apply an anti slip take which is basically a glorified sandpaper on a sticky backing.
- How much does a decking cost?
- It all depends on the size, shape, access and materials. For a very rough idea to install a wooden raised decking on posts, you’re talking perhaps £1,250-£2000 for 10m2.
- The average cost for decking is £1,750
- Alternatively you could calculate the rough cost at £125-£175 per m2
If decking isn’t for you and you already have a patio then why not give it a revamp at a fraction of the cost of installing a new decking?


Leave a Reply